Even when you're trying really hard NOT to procrastinate, it's amazing how much time can pass between finishing a project and finishing the webpage for the project. This one has got to be a record for me, but thankfully, it's not all due to my formidable power to put things off! Right after I completed this diorama, I got a part in a local comedy play.
Rehearsals took up the majority of my free time, and what little was left I spent relaxing with far less demanding activities than Lego photography! As many AFOL's know, taking acceptable pictures of your creations can be even more challenging than making the creation itself, and this MOC presented me with my biggest learning curve yet!
.JPG)
I posted the above picture on www.classic-space.com on May 16th, 2009! SEVEN MONTHS LATER and I'm finally finished! I believe another factor to the huge time gap was the fact that I'd been looking at the damned thing for months after I'd finished and my enthusiasm began to recede very quickly. I wanted to make other stuff, but I couldn't because I had this massive monstrosity taking up all my building room! I finally assembled the main batch of pictures on November 15th, 2009.
I'd done several sessions of photography, and each time some element, be it a misaligned laser turret or impromper camera settings, resulted in photos that were unusable. I'm still not completely satisfied with these pictures, but I did learn take advantage of different settings on my digital camera.
I also worked on how to order the pictures so that they don't jump back and forth, which I think helps the viewer feel more like they're actually walking around the model and inspecting it. The funniest part of the whole story is that it all began with the ship, but more about that in a moment! Right now it's time to. . .
SCREAM!! RUN!! HIDE!! BLACK FANTASY IS ATTACKING!!
A godless shape appears out of the blood red darkness, lurching with a sickening, yet inexorable slither towards our brave spacemen who stage a desperate but futile battle!
.JPG)
I'd built the Assymetron Patrol Craft (webpage on that coming soon!) quite awhile ago and I thought that I should try making a diorama for it. One with all the implied action and suggestive story elements that would really capture a mood and a moment frozen in time. Many of the MOC's that I've admired, big & small, have benefited greatly from this technique, and I wanted to see what I could do.
.JPG)
I envisioned the ship as stopping at a remote transmission station for a routine maintenance check. I built the tower first and then things began to grow around it.
.JPG)
.JPG)
The transmission tower is built on the caldera of an ancient volcano. Thought it has long been dormant, the volcano is the highest point for miles around and a seemingly sensible location. However, unbeknownst to the construction crew, this site is located near an area infested with extremely nasty fauna in the form of hideous obsidian snakes, spiders and scorpions.
Luckily, a natural rock ridge keeps the majority of them from escaping and mucking with the machinery, but automated laser turrets have been installed to atomize the pesky few who manage to climb out.
.JPG)
Since this station is so remote, no exobiologists have yet been sent to study the strange creatures swarming in the black pits. This would've been a very wise thing to do because as you can see, the turrets are currently occupied with a MUCH larger and more dangerous target!
Making the rock barrier look naturally irregular (and not like a wall) was quite challenging, and I used up almost all of my tan roof slopes to achieve maximum randomness. The new 1x1 tooth piece was particularly helpful.
I also made a Bricklink purchase to give me all the 1x1 tan tiles I used to suggest collected pockets of sand. If only there was a tan 1x1 cheese wedge available!
.JPG)
I was very pleased to have this girder-like arrangement around the mouth of the caldera. I really wanted to achieve the effect of the tower looking like it was built right over the top. There is a Technic motor buried in the base, and the entire shaft within rotates along with the entire antenna assembly. * Movie links at the bottom of the page! *
.JPG)
.JPG)
For the giant antenna assembly I began with all of my droid arms and the 2x2 plate with the octagonal rod frame. I could only make six arms, but that was great because I was then inspired to come up with the two gray pods on the top and bottom. Getting all these bits to attach firmly to the center took quite a bit of troubleshooting!
.JPG)
I wanted a design that would look technologically complex and yet sturdy. A machine that could be left to run on its own for the majority of the time and survive in a hostile environment. It should also give the appearance of being able to perform multiple functions, and I think the arms with the dishes combined with the two detailed gray pods evoke that well.
.JPG)
.JPG)
I paid a lot of attention to the rear of the antenna assembly, making a point to include some randomization. I always have to remind myself that assymetrical greebling is often more interesting and more realistic.
.JPG)
.JPG)
OMG, what is this massive, black, squid-like monstrosity in our midst?! OH NO, it's Black Fantasy out for blood!
I decided that the black area in the diorama is some kind of vile nursery for Black Fantasy larvae, which come in many forms as the "adults" do. The creature is enraged because the automated laser turrets have zapped too many of its babies, and their hideous screams were heard across the infinite void of space.
.JPG)
REVENGE!! REVENGE!! DESTROY THE INVADERS!! BLOOD FOR BLOOD!!
.JPG)
Though all their defense technology is brought to bear, the brave spacemen cannot hope to withstand the onslaught of an angry Black Fantasy creature whose spawn have been thoughtlessly obliterated!
.JPG)
Wait, what's that on top?! Could it be some kind of driver?!
.JPG)
.JPG)
Yes, indeed! There are many creatures in the Black Fantasy bestiary, and as fearsome as this one is, it is merely beast of burden, spurred to do its masters bidding with reins of hatred!
.JPG)
.JPG)
I don't know which set the dual-batwing piece on the back comes from, but it's a great little extra dash of creepy.
.JPG)
Before we turn attention to the bloodbath, there are other details to take in, such as the Assymetron Patrol Craft and the mottled landscape. This was my first attempt to create texture by applying plates in multiple levels and arrangements of different colored tiles to evoke a dry, rocky and sandy terrain. I went a bit overboard, but overall I think it works fairly well.
With the ship removed you can see how I attempted to create a burn pattern in the sand from the landing engines. I wanted the sand to appear to have been blasted with so much heat that it turned into blackened glass. I also wanted the pattern of stones to appear as if they'd been blown away by the force of the engine exhaust.
.JPG)
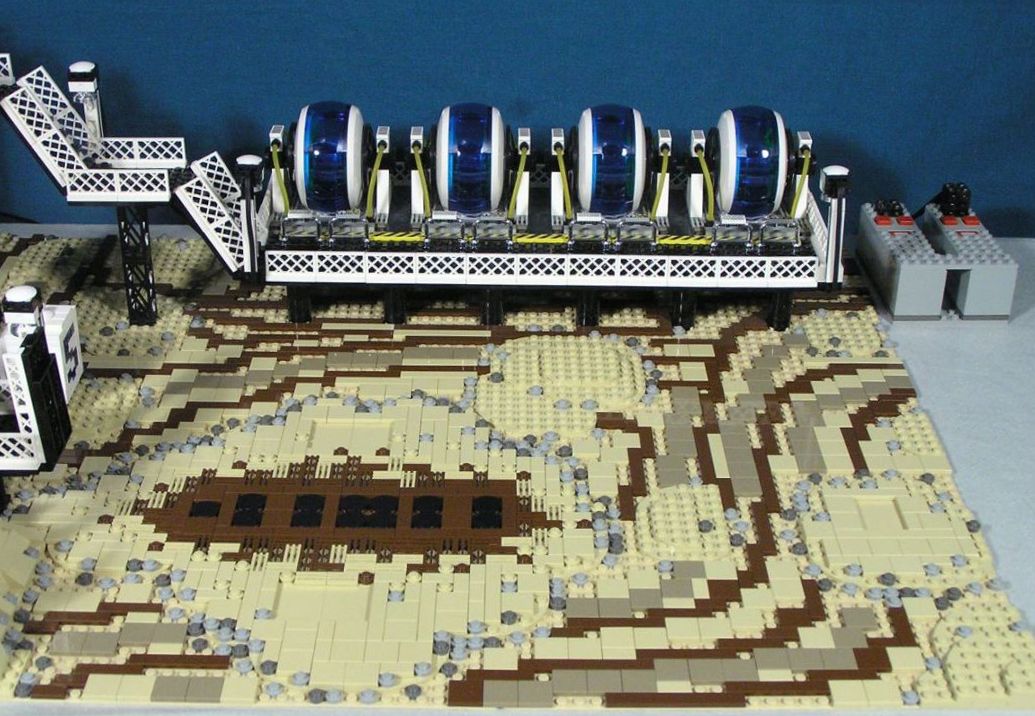
Since the volcano is dormant (making heat exchangers useless) the tower needs a energy source of some kind. I fiddled with my X-Pods a bit and came up with these power cells.
.JPG)
Of course, each power cell has its own monitoring and interface terminals.
.JPG)
I have a real love affair with 9V lighting, and after some more fiddling I was able to give each power cell a flickering underside!
.JPG)
With the two big spotlights turned off, the effect is even more noticeable!
.JPG)
All that power ain't gonna save your butt, though, 'cause Black Fantasy is gonna getcha and eatcha! One intrepid spaceman has already fallen, but where's his head?!
.JPG)
"SAVE ME!! SAVE MEEEEEEEEEEEEEEEEEEEEEEEEEEE!!"
.JPG)
"DON'T WORRY, BUDDY!! I'LL BLAST ITS TENTACLES RIGHT OFF!! OH NO, IT'S NOT HAVING ANY EFFECT!!"
.JPG)
*gurgle*
.JPG)
MMMMMOOOOOOOOOOOOOOORRRREEEBRAAAAAAAAAAAAIIIIIIIIIIIIIINNNSSSSSSSSS!!
I have one of those light cables strung across my ceiling that's all red bulbs. That combined with the night setting on my digital camera (plus a +2.0 exposure) and I was able to get some decent "mood" shots.
.JPG)
The power cells look particularly strong bathed in a red glow!
.JPG)
.JPG)
As I gained more experience with the right camera settings, I was able to capture a few shots using solely 9V illumination. This was a relief as the red glow tended to blur details, as can be seen above.
.JPG)
.JPG)
The station ID box was a last-minute addition. It was fun trying to make the numeral distinctive and yet small enough to fit within the diorama without crowding anything.
.JPG)
At the heighest level of the gantry is the access terminal for the tower. I almost forgot to photograph this since it's always on the other side of the model and out of my sight!
.JPG)
These last few shots provide a few more comparisons between my lighting options. The combo of 9V and red cable light worked better when closer to the subject.
.JPG)
.JPG)
.JPG)
.JPG)
.JPG)
I particularly wanted to get a few shots that showed how the 9V bulbs I positioned at the base of the tower spotlight the craggy rock face and the antenna assembly.
.JPG)
.JPG)
A view looking up always helps to enhance the feeling that the structure is looming over you. I was really jazzed with how even the slow motion of the rotating assembly blurred a bit to help convey movement. The low light settings really helped with that.
I've got two more pictures, and I'm sure they'll entertain you, but I have to say that only the first one made me happy at the time. The second provoked an equally strong adverse reaction, and I'm sure many of you builders with fuzzy "supervisors" will know exactly what I mean as you scroll down. . .
.JPG)
WHY KITTENS ARE AWESOME.
.JPG)
WHY KITTENS SUCK.
Click here to see a video of the diorama in full lighting (sans damage). 147 MB!
Click here to see a video of the diorama with reduced lighting in order to see the 9V lights a little better. 118 MB!
I paid a lot of attention to the rear of the antenna assembly, making a point to include some randomization. I always have to remind myself that assymetrical greebling is often more interesting and more realistic.